My late start to the 2022 riding season received a further delay when one of the fork seals on my 2008 Yamaha FJR 1300 started leaking on my first ride of the year. The fork rebuild proved to be one of the most frustrating and haphazard maintenance tasks I’ve tackled, but I came away from the experience with more confidence in my mechanical abilities than ever before.
The Problem
I’d gotten a late start on my 2021-2022 winter maintenance on the FJR due to a back injury and didn’t have the bike ready to roll until mid-April. Each year, I do a short ride on local city streets to make sure I didn’t forget to tighten up or reinstall anything before I get on a freeway for the first time.
On that first ride of the year, I applied the brakes as I approached a stoplight and felt the forks dive more than usual and stick for a moment before reextending. I didn’t want to look inside the fairing to see if the fork seals were leaking, but I knew I needed to. Sure enough, the right-side fork had fluid pooling on top of the dust seal. I headed back to my garage, dismounted the bike and realized I was probably going to lose a good bit of riding time due to having to do a repair I hadn’t done before.
After getting some advice from professional mechanic and MotoAmerica Twins Cup rider Jared Trees about fork repairs, I ordered parts to rebuild both forks. Jared told me that if only one seal goes, the other one is likely to fail soon as well. I also hadn’t changed my fork oil since I bought the FJR before the 2018 riding season, so the forks were overdue for a fluid change anyway.
I ordered the parts, found a really good write up on how to perform the repair and located the applicable section in the FJR1300 Haynes Manual. I then had to wait about 10 days for the parts to come in. But even after I got the parts, I let another weekend go by before I finally started to tackle the job.
Honestly, I was scared. I’d never done any kind of maintenance or repair on a fork and I was putting a lot of pressure on myself because I didn’t want to miss out on too much time. To deal with the anxiety, I made myself put off the work so I wouldn’t try to rush too much when I did start it. That proved to be a mistake.
The Right Fork Leg
I got the motorcycle’s front end lifted up with the stand I use when I remove the wheel to change the front tire and removed both fork tubes. I started working on the right-side tube (the one that was leaking), and it didn’t take long for problems to arise.
I got the fork cap unscrewed from the upper fork tube and – with some elbow grease – got the cap unscrewed from the dampening rod. I should’ve poured the fork oil out before removing the cap, as it would’ve been easier to use the two open-ended wrenches to loosen the cap. Next, I pulled out the springs and washers and cleaned them with Maxima’s Suspension Clean – which really works well.
The first issue came up once I had the innards out. I had bought a 26mm socket to use to hold the damping rod in place for its removal, but hadn’t realized how recessed in the fork the hex piece that the socket goes onto was.
What I’d read before starting this was to get a specialty fork removal tool or weld a socket extension onto the end of the 26mm socket – though I couldn’t understand why until I was staring eight inches or so down the tube at the socket’s target. I don’t have any welding experience and wanted to find a cheaper method.
A couple days later, I found something in an FJR forum that described how someone had used half-inch metal tubing to hold the socket in place when unscrewing the fork’s bottom bolt. Off to Menards I went and bought a 36-inch stick of square tubing. I got home – thinking my problem was solved – but discovered the tubing wasn’t perfectly straight. It wouldn’t go down far enough on the damping rod to reach the socket.
I could have used a map torch to heat up the tubing and bend it back straight, but opted to cut the tubing down to about 18 inches and going to Harbor Freight to buy a 3/8-inch by 12-inch drill bit. I used the bit to ream out the inside of the tubing so that it would be straight enough to slide over the damping rod. After drilling and cleaning out the shards inside the tubing, I was delighted when it slid down the rod and into the socket’s half-inch drive space.
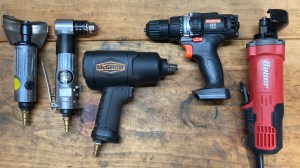
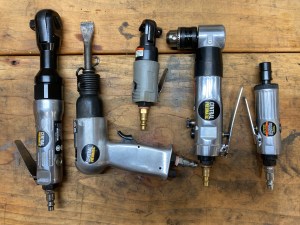
Next up was removing the screw at the bottom of the fork that held the damping rod in place. I’d read on the interwebs that an impact gun was recommended. The torque spec for the fork bottom bolt was about 25 pounds-feet for reassembly, so I figured a breaker bar should be able to do the job just fine. Oh, how wrong I was. I was holding the half-inch tubing with a half-inch open-ended wrench in one hand while attempting to push the breaker bar down with the other hand.
After several futile attempts I decided to get out my air ratchet, as I figured the bolt just needed a little air power to come loose. After almost breaking my wrist a couple times from the air ratchet not having enough umph to get the bolt out, I caved and got out my impact gun. I put it on the lowest setting, and – after a fair bit of impacting action – the bolt finally came loose.
With the last of the parts out of the fork tubes, I could go to work on getting the seals and bushings out. I sprayed down the inside of the tube with a liberal amount of Maxima Suspension Clean, then began using the slide-action method for getting the fork seals and bushings out. This went pretty smoothly, as you just try to pull the inner tube out of the outer tube with some gusto – which causes the bushings to “hammer” out the seals and separate the tubes.
I figured I was over the worst of it, and got the lower bushing into its groove at the bottom of the inner tube and slid the tubes back together. However, the metal tube I’d bought on Amazon to help with hammering the mid-bushing into place was too narrow to go over the inner fork tube. The first thing I tried was cutting the tube length wise to make it wide enough to go over the inner tube, but I couldn’t get the sharp edges rounded enough to be confident they wouldn’t gouge the inner tube.
Off to Advance Auto Parts I went. I found an exhaust coupler that was a tad wider than the Amazon tube, but that piece ended up being a little too wide. It would go around outside of the inner fork tube, but wouldn’t fit inside the outer fork tube.
I had seen online that someone had used an exhaust tip, but the version I had been reading didn’t have any photos in it. A little Googling located a PDF version of the write-up complete with photos. I found the part number for the exhaust tip (PMZ-021) and drove to the other side of Cleveland after work the next day to procure one. I followed the directions in the write-up and cut the curled end of the exhaust tip off. It fit perfectly over the inner tube and inside the outer tube, and I was able to use the tip and a fork seal driver to hammer the mid-bushing into place.
Next I drove in the upper bushing what I thought was all the way (more on that later), and then got ready to install the fork seal. I’d read that it’s essential to lubricate the inner lip of the fork seal liberally with fork oil to prevent the rubber from tearing during installation. What I didn’t consider was how important lubricating the outside lip of the seal was.
The seal slid down the lubricated inner fork tube just fine, but I realized I had a problem when I started trying to hammer the seal into place with the fork seal driver. The seal didn’t want to settle into its pocket in the top of the outer fork tube despite my relentless efforts to get it to seat. I eventually got it down far enough to where I could use the smooth end of a small angle pick to force the circlip into place, and I was hoping I hadn’t done anything too wrong. My mechanic/MotoAmerica racer friend Jared Trees informed me (after the fact) that it’s important to lube both the inside and outside lips of a fork seal – which got proven correct a few days later.
I finished up the right fork by reinstalling the damper rod – which took a bit of elbow grease with a torque wrench – then filled the fork with fresh fork oil and reinstalled the fork cap.
The Left Fork Leg
With the struggles of doing the first fork leg behind me, I figured the second fork leg wouldn’t be as bad. It was much simpler – so much so that I realized how much I had probably erred as I sped through the rebuild process the second time around.
I got the fork cap off and poured the old fork oil out before unscrewing the fork cap – which made for a less messy job. After removing the spring and spacers, I sprayed down the parts I’ve removed with the suspension cleaner and went to work on removing the damper rod.
I slid the 26mm socket and half-inch tubing down the rod, positioned my open-ended wrench on the tubing and used the impact gun to quickly remove the bottom screw.
After cleaning out the inside of the tubes, I used the slide-hammer action to separate the tubes, got the seal and bushing right off and installed the new bottom bushing. The inner tube slid nicely into the outer tube, and I went to work getting the mid bushing, upper bushing and washer installed. After seeing a picture of what the upper bushing was supposed to look like when fully seated, I made sure to pound that bushing in fully – and realized I may have not fully seated it on the right fork.
I made sure to lubricate both lips on the fork seal, and, with a few good hammers, the seal sank right into place and the circlip snapped into its groove. I got the rest of the fork put back together – and allowed some extra time after I filled it with fork oil before I set the oil level.
It had taken me about two weeks of on-again, off-again work to get the right fork done. The left fork took me about three hours with me taking my time.
I got the forks reinstalled on the FJR1300 and hoped I had gotten everything right — or at least right enough to get through the riding season.
The Right Fork Leg – Again
I took the FJR out for my second ride of the year – a shake-down cruise on Interstate 480 to Oberlin, Ohio, and back. After I’d turned around to head home, I looked down to the inside of the bike’s fairing and saw the right fork leg leaking again. It was just a trickle of fluid compared to the pool that I’d seen on my first ride of the year.
Though I had the confidence that I could do the rebuild correctly the second time around, I wasn’t sure if I’d be able to get the needed parts in time to not lose too much more riding time. I got home and ordered the parts on Partzilla – and got their last set of fork bushings for an FJR.
I took the fork back off the bike and started tearing it down. I got the cap off, the fluid out and spring, spacers damping rod removed. When I went to do the slide-hammer action to separate the fork tubes, I discovered another problem. On the first pull, the tubes separated without resistance and revealed that somehow the lower bushing had come out of its groove at the bottom of the inner fork tube and the mid bushing had become unseated too. I was able to extract the lower bushing out of the tube with pliers, but then had to figure out how to get the oil seal and upper bushing out.
Some online research determined that Harbor Freight sells an inexpensive seal puller. After watching a video of one being used to pull a rubber car axle seal, I bought one and it worked perfectly for getting the rubber oil seal out.
The upper bushing was not so forthcoming. I couldn’t get enough leverage on the tool while using the aluminum top lip of the outer fork tube for leverage – which got dented a little in several spots. Not wanting to do more-than-cosmetic damage to the tip lip of the outer fork tube, back to Google searching it was. I found a video of someone who had a very similar situation to mine and had cut a closet dowel rod and used it to get sufficient leverage on a hand tool to remove an upper bushing.
It was late at night when I found that video, so I had to wait until the next morning to go to Home Depot and buy a closet rod. The first time I cut the rod, the piece ended up being too short. It needed to be taller so that the head of the seal puller would rest on the wood and not reach the opposite side of the outer fork tube. Another cut with a circular saw and I had the correct length. I had the seal out in about a minute or two … and, at long last, I’d crossed the last hurdle for my fork rebuild.
Reassembly went smoothly after that and I took my third motorcycle ride of 2022 in during Memorial Day weekend.
From Frustration to Confidence
I was incredibly frustrated that I’d lost about six weeks of riding because of something that – with experience – I could’ve fixed in a few hours. As frustrating – and pricey – as the project was, I came out of it as confident in my mechanical abilities as I’ve ever been. I was proud that I hadn’t given up and had shown the resourcefulness to find ways to solve problems I’ve never dealt with before.
In time, perhaps the lost miles will pay off in shorter repairs – to forks or other parts of a motorcycle – in the years to come.


Leave a comment